Sources Panel
Sources
Panel
is divided into four tabs which are expanded by clicking the desired tab's
header:
·
Repository
Explorer tab,
·
Favorites
tab,
·
Control
Panels tab and
·
Connections
tab.
Repository
Explorer
Repository explorer
allows you to work with the Repository, which is used to organize and store your
documents.

Repository can contain
any number of root nodes with associated folders and files. There are three
types of root nodes: Server, File System and WebDAV.
Server root node shows
contents of the database that is associated with
repository.
File
System
root node allows you to work with documents kept on a server's file
system.
WebDAV is associated with
folders and files on the Web Server, using Web Distributed Authoring and
Versioning (WebDAV).
You can use Repository
Explorer to easily locate and open documents. For a document of type Analysis,
double-clicking on it will open it in Designer. Dynamic document, Static
document and Dashboard document will be open in Document Viewer (both Designer
and Document Viewer will be open in separate Browser's
tab).
To work with repository
explorer, you need to have repository account. After installation, administrator
is required to create Repository Administrator (See Post-Installation Setup
section of this document for more info). Repository Administrator has full
access to Repository, and is able to create other user's repository
accounts.
In order to work with
repository, the user must have a repository account that can be set by
administrator. On the first use of the Portal, the user will be required to link
his or her repository account with windows account, using Connect to Repository
dialog, shown in Figure 3-4.
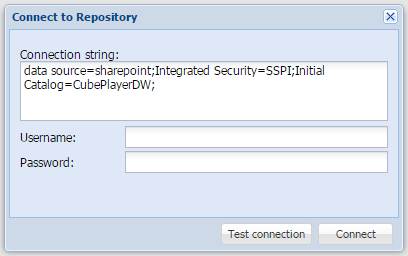
Connection string
shown
here is the one stored in a configuration file. It is created during
Post-Installation setup phase, and defines a connection between the Portal and
Repository. For the user to be able to connect to a different repository,
connection string can be changed.
Important: making change in the
connection string WILL NOT change a connection string saved in configuration
file. Unless you wish to use a different Repository database, do not make
changes to this field.
Username
and Password fields are used to enter Repository user credentials that are
created by an Administrator. Those credential need not to be the same as your
Windows credentials, and are set by administrator who created your repository
account.
By clicking the Connect button (Alternatively, you can
click Test connection button before
to validate the information you entered), a link will be set between your
Windows Account and Repository Account, and you will be able to work with it.
You will need to do this only once, so the next time you use the Portal, it will
recognize your repository account (because it is already linked to your Windows
account), and you will be able to use repository right
away.
Important: The Repository User
Account can only be linked to a single Windows Account, so if you log on to the
Portal with different Windows credentials, a link between Windows and Repository
account will be altered.
Repository explorer has
a toolbar below its header with buttons for different repository actions. The
actions are as follows:
|
|
Create new repository location (or the root node) |
By clicking this button,
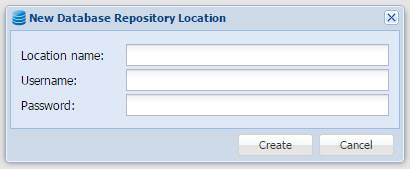
you'll be able to choose (from a drop down menu) between Server, File System or WebDav locations.
For the Server location, you need to supply
location's name, repository username and password (not the Windows username and
password).
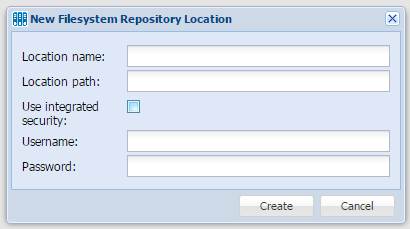
For the File System location, you need to
supply location's name and path to the location (i.e. d:\ or d:\reports). If you
want to connect to file system location that requires credentials, uncheck the
Use Integrated Security checkbox and supply username and password in their
respective fields.
Important: for the location path,
you have to use existing file system location. If you enter non-existing
location, it will not be created.
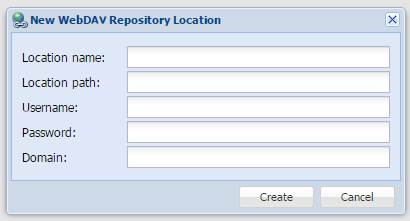
For the WebDAV location, you need to supply
location's name, location path (i.e. http:\\myServer),
and username, password and domain for the location you are connecting
to.
|
|
Edit Repository location |
Select the root node you
wish to edit, and click this button to open dialog to change location name,
location etc. Dialog looks the same as in figures 3-5, 3-6 and
3-7.
|
|
Delete Repository location |
Select the root node you
wish to remove and click this button to delete it.
Important: this action WILL NOT delete the underlying
location, it will only remove it from the Repository, but data from the location
will be persisted. For example, if you created a File System location that
points to d:\myReports and then delete it, the folder on the drive d:\myReports
will not be deleted. The same goes for Server or WebDAV locations,
too.
|
|
Create new Repository user |
Clicking this button
will open the Add New User dialog.
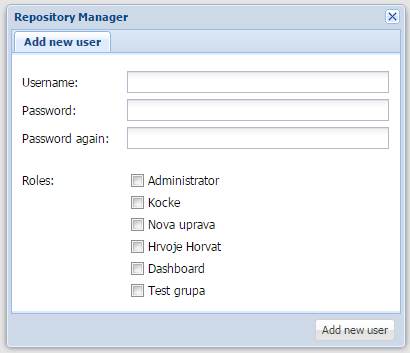
Figure 3-8: Create New
Repository User dialog
To create new user, you
need to supply username, password, and select user group(s) that this user will
belong to. After clicking the button Add new user, the username and password you
provided can immediately be used to connect to the
Repository.
|
|
Connect to Repository |
Use this button to
connect to a different repository, or as another user.
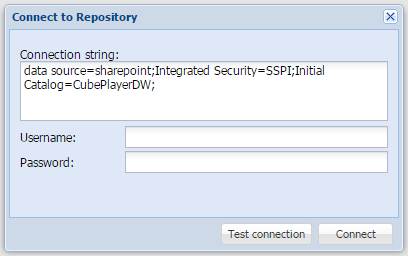
Figure 3-9: Connect to
Repository dialog.
If you wish to connect
to a different repository, modify Connection String to point to desired
database. If you wish to change username, leave the Connection String field
unchanged, and supply Username and
Password of the user you wish to
connect as. Use the button Test
Connection to validate fields. To finish, click the button Connect.
Favorites
Tab
It contains the list of
last used reports. For this version, it will contain only Dynamic, Static and/or
Dashboard document selected from the Control Panel.

Control Panels
Tab
With the Control Panels
tab, you can browse and select any Control Panel that is defined on the location
provided in the Post-Installation setup (see Post-Installation Setup chapter for
more details).

Simply by clicking
desired Control Panel, the page will be reloaded with the desired Control Panel
in place.
Connections
Tab
This tab is used to
connect to a OLAP server and start the designer. To
open connection, You can either click on any previously
saved connection and click the button Open Selected, or double click on
connection.

To create and open a New
Connection, click the Create New
button to open the New Analysis dialog.

Figure 3-13: Create new
Connection (or the New Analysis)
In the New Analysis
dialog, the required fields are printed in bold.
If you wish to save this connection to be added to a list of connections in the Connections Tab, provide Connection Name, and check the Save this connection checkbox before clicking Open.
 Repository Explorer